

As a developer or application administrator, if you design and manage cloud-native applications on Oracle Cloud Infrastructure Container Engine for Kubernetes (OKE) x86 instances and you are wondering how to leverage the lower cost and higher performance of OCI Ampere A1 based instances without a full lift and shift migration to Arm64, this post is for you.
In this post, we will showcase an incremental migration of a full stack cloud-native application to OKE Ampere A1 instances. We will use WordPress as an example LAMP (Linux, Apache, MySQL, PHP) stack application. Each component in this application stack is relatively independent of the others and so redeploying any one component, for example the MySQL database to an Ampere node is straightforward.
We take a step-by-step look at how to migrate the MySQL database on OKE, with almost no downtime, from VM.Standard3.Flex (Intel) nodes to VM.Standard.A1.Flex (Ampere) nodes. We begin by deploying WordPress from a Bitnami maintained Helm chart, with one Apache/PHP WordPress pod, a primary MySQL pod, and one secondary replica MySQL pod, all running on x86 nodes, with data being stored on OCI block volume and file storage for persistence. This database architecture uses MySQL asynchronous replication where the primary node is the replication source.
We will then create an Arm64 node pool and add additional MySQL replicas that will run on these newly created nodes, which will automatically replicate the data and ensure that all of our data is now available on the Arm64-hosted MySQL nodes. Finally, we will make one of the Arm64-hosted nodes the primary node for our MySQL cluster and shut down the x86-hosted database nodes. In the end, you now have a hybrid x86/Arm64 cluster with WordPress containers running on x86, and MySQL running on Arm64.
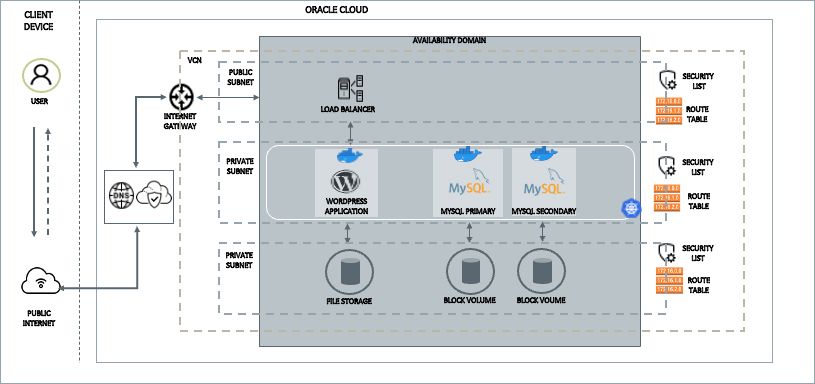 An architectural diagram representing the WordPress deployment.
Deploy WordPress Application on OKE 3-Node Cluster
We start by creating an OKE cluster using the OCI web console. The cluster is setup with 3 nodes, using the VM.Standard3.flex shape. We use bitnami/wordpress and bitnami/mysql containers for deploying the application. Both these images are supported on x86 as well as Arm64 and use helm charts for easy deployment and upgrades using Kubernetes manifest files.
Step by step instructions for deploying the application are provided in the Appendix section.
Once the cluster is created and the application deployed, verify the WordPress frontend and application pod, MySQL primary pod and MySQL secondary pod are up and running on the OKE cluster.
$ kubectl get pods -o wide NAME READY STATUS RESTARTS AGE IP NODE NOMINATED NODE READINESS GATES wordpress-demo-5d8d554d8d-gg2wd 1/1 Running 0 119s 10.244.3.134 10.0.10.217 <none> <none> wordpress-mysql-primary-0 1/1 Running 0 5m23s 10.244.4.2 10.0.10.78 <none> <none> wordpress-mysql-secondary-0 1/1 Running 0 5m23s 10.244.4.131 10.0.10.214 <none> <none>
Migrate MySQL Secondary Database to Ampere A1 Instance
Next, we will add Ampere A1 instances to the OKE cluster and then extend the WordPress application's MySQL database to run on the A1 instances in a few easy steps. As a general best practice, it’s recommended to test the process in a non-production environment.
Step 1: Add an Ampere A1 node pool to your OKE cluster
Using the OCI console, update your OKE cluster and add a new node pool. Use the same placement configuration as your x86 nodes.
Select the VM.Standard.A1.Flex shape. Choose 2x the number of OCPUs as your x86 nodes, for example 2 OCPUs on VM.Standard.3.Flex instance is equivalent to 4 OCPUs on VM.Standard.A1.Flex instance. The Oracle CPU (OCPU) unit of measurement for x86 OCPUs is worth two vCPUs but an Ampere OCPU is a single vCPU.
A new node-pool and new instances with Ampere A1 shapes will be added to your cluster. We will migrate the MySQL pods to the newly added Arm64 nodes.
$ kubectl get nodes -o wide -l kubernetes.io/arch=amd64 NAME STATUS ROLES AGE VERSION INTERNAL-IP EXTERNAL-IP OS-IMAGE KERNEL-VERSION CONTAINER-RUNTIME 10.0.10.214 Ready node 40m v1.26.2 10.0.10.214 <none> Oracle Linux Server 8.7 5.15.0-6.80.3.1.el8uek.x86_64 cri-o://1.26.2-142.el8 10.0.10.217 Ready node 41m v1.26.2 10.0.10.217 <none> Oracle Linux Server 8.7 5.15.0-6.80.3.1.el8uek.x86_64 cri-o://1.26.2-142.el8 10.0.10.78 Ready node 41m v1.26.2 10.0.10.78 <none> Oracle Linux Server 8.7 5.15.0-6.80.3.1.el8uek.x86_64 cri-o://1.26.2-142.el8 $ kubectl get nodes -o wide -l kubernetes.io/arch=arm64 NAME STATUS ROLES AGE VERSION INTERNAL-IP EXTERNAL-IP OS-IMAGE KERNEL-VERSION CONTAINER-RUNTIME 10.0.10.122 Ready node 2m38s v1.26.2 10.0.10.122 <none> Oracle Linux Server 8.7 5.15.0-6.80.3.1.el8uek.aarch64 cri-o://1.26.2-142.el8 10.0.10.82 Ready node 2m15s v1.26.2 10.0.10.82 <none> Oracle Linux Server 8.7 5.15.0-6.80.3.1.el8uek.aarch64 cri-o://1.26.2-142.el8
Step 2: Extend the MySQL secondary pod to an Ampere A1 node
In order to migrate the MySQL secondary pod, start by adding a replica of the secondary pod on the Arm64 node. This step is optional. We will deploy multiple replicas of the MySQL secondary pod to ensure data consistency and availability on the new Arm64 instance. If you do not want to create multiple replicas, you can skip to the next step and migrate the MySQL secondary pod to Arm64 without the additional validation.
You can extend the MySQL secondary pods to the Ampere A1 nodes, without any interruptions to the web application.
Change the number of replicas for the secondary pods in charts/bitnami-mysql/values.yaml. Also update the nodeAffinityPreset values to allow the pods to be deployed on Arm64 nodes.
secondary: name: secondary replicaCount: 2 nodeAffinityPreset: type: "hard" key: "kubernetes.io/arch" values: - amd64 - arm64
Use the helm upgrade command to install the updates to your manifest file
helm upgrade wordpress-mysql -f ./charts/bitnami-mysql/values.yaml bitnami/mysql
Check the pod status using Kubectl. You will notice a new replica of the MySQL secondary pod “wordpress-mysql-secondary-1” running on one of the Ampere A1 nodes.
$ kubectl get pods -o wide NAME READY STATUS RESTARTS AGE IP NODE NOMINATED NODE READINESS GATES wordpress-demo-5d8d554d8d-gg2wd 1/1 Running 0 24m 10.244.3.134 10.0.10.217 <none> <none> wordpress-mysql-primary-0 1/1 Running 0 27m 10.244.4.2 10.0.10.78 <none> <none> wordpress-mysql-secondary-0 1/1 Running 0 36s 10.244.4.133 10.0.10.214 <none> <none> wordpress-mysql-secondary-1 1/1 Running 0 2m13s 10.244.5.130 10.0.10.82 <none> <none>
The MySQL BinLog (Binary Logs) is responsible for handling the replication. Verify the replication status by connecting to the MySQL database.
mysql> show processlist; +-----+-----------------+--------------------+------+-------------+------+-----------------------------------------------------------------+------------------+ | Id | User | Host | db | Command | Time | State | Info | +-----+-----------------+--------------------+------+-------------+------+-----------------------------------------------------------------+------------------+ | 5 | event_scheduler | localhost | NULL | Daemon | 1638 | Waiting on empty queue | NULL | | 617 | replicator | 10.244.5.130:46208 | NULL | Binlog Dump | 98 | Source has sent all binlog to replica; waiting for more updates | NULL | | 630 | replicator | 10.244.4.133:45986 | NULL | Binlog Dump | 68 | Source has sent all binlog to replica; waiting for more updates | NULL | | 653 | root | localhost | NULL | Query | 0 | init | show processlist | +-----+-----------------+--------------------+------+-------------+------+-----------------------------------------------------------------+------------------+ 4 rows in set (0.00 sec)
Step 3: Migrate the MySQL secondary pod to an Ampere A1 node
As mentioned earlier, you can directly migrate the MySQL secondary pod to the Arm64 node. The MySQL pod uses OCI block volumes that can be detached from an instance and moved to a different instance without the loss of data. This data persistence enables you to migrate data between instances and ensures that your data is safely stored, even when it is not connected to an instance. Any data remains intact until you reformat or delete the volume.
In order to migrate the MySQL secondary pod to Ampere A1 node, update the helm chart and set the nodeAffinityPreset to arm64 and remove amd64. At the same time, you can also reset the replicaCount back to 1.
secondary: name: secondary replicaCount: 1 nodeAffinityPreset: type: "hard" key: "kubernetes.io/arch" values: - arm64
Use the helm upgrade command to install the updates to your MySQL manifest file.
helm upgrade wordpress-mysql -f ./charts/bitnami-mysql/values.yaml bitnami/mysql $ kubectl get pods -o wide NAME READY STATUS RESTARTS AGE IP NODE NOMINATED NODE READINESS GATES wordpress-demo-5d8d554d8d-gg2wd 1/1 Running 0 28m 10.244.3.134 10.0.10.217 <none> <none> wordpress-mysql-primary-0 1/1 Running 0 31m 10.244.4.2 10.0.10.78 <none> <none> wordpress-mysql-secondary-0 1/1 Running 0 77s 10.244.5.131 10.0.10.82 <none> <none>
You will notice the MySQL replica on the x86 node is deleted and a new replica created on the Arm64 node. Verify the replication status again at this stage.
mysql> show processlist; +-----+-----------------+--------------------+------+-------------+------+-----------------------------------------------------------------+------------------+ | Id | User | Host | db | Command | Time | State | Info | +-----+-----------------+--------------------+------+-------------+------+-----------------------------------------------------------------+------------------+ | 5 | event_scheduler | localhost | NULL | Daemon | 1854 | Waiting on empty queue | NULL | | 617 | replicator | 10.244.5.130:46208 | NULL | Binlog Dump | 314 | Source has sent all binlog to replica; waiting for more updates | NULL | | 727 | replicator | 10.244.5.131:45904 | NULL | Binlog Dump | 68 | Source has sent all binlog to replica; waiting for more updates | NULL | | 752 | root | localhost | NULL | Query | 0 | init | show processlist | +-----+-----------------+--------------------+------+-------------+------+-----------------------------------------------------------------+------------------+ 4 rows in set (0.00 sec)
You can now delete the x86 node that was running the old replica for MySQL secondary, in this example the node with ip address “10.0.10.214". This step does not require any service downtime and you have now successfully migrated your MySQL secondary pod to the Ampere A1 instance.
Migrate MySQL Primary Database to Ampere A1 Instance
In the previous step, we migrated the MySQL secondary pod of the WordPress deployment to Ampere A1 node. The next step is to migrate the MySQL primary pod to the second Ampere A1 node in the same OKE cluster.
NOTE: It is recommended to test the process in a non-production environment using a snapshot of your production database. When performing a failover of the MySQL primary database in a production environment, please make sure you have a full backup of the database and follow all the steps that are recommended for database failover.
In order to failover the MySQL primary pod, reset the nodeAffinityPreset in charts/bitnami-mysql/values.yaml to use node with labels kubernetes.io/arch=arm64.
primary: nodeAffinityPreset: type: "hard" key: "kubernetes.io/arch" values: - arm64
Use the helm upgrade command to install the updates to your manifest file.
NOTE: This step will disrupt your application's connectivity to the database for few minutes, please plan for service downtime.
helm upgrade wordpress-mysql -f ./charts/bitnami-mysql/values.yaml bitnami/mysql $ kubectl get pods -o wide NAME READY STATUS RESTARTS AGE IP NODE NOMINATED NODE READINESS GATES wordpress-demo-5d8d554d8d-gg2wd 1/1 Running 1 (3m19s ago) 37m 10.244.3.134 10.0.10.217 <none> <none> wordpress-mysql-primary-0 1/1 Running 0 4m2s 10.244.5.2 10.0.10.122 <none> <none> wordpress-mysql-secondary-0 1/1 Running 0 10m 10.244.5.131 10.0.10.82 <none> <none> $ kubectl get nodes -o wide -l kubernetes.io/arch=arm64 NAME STATUS ROLES AGE VERSION INTERNAL-IP EXTERNAL-IP OS-IMAGE KERNEL-VERSION CONTAINER-RUNTIME 10.0.10.122 Ready node 21m v1.26.2 10.0.10.122 <none> Oracle Linux Server 8.7 5.15.0-6.80.3.1.el8uek.aarch64 cri-o://1.26.2-142.el8 10.0.10.82 Ready node 21m v1.26.2 10.0.10.82 <none> Oracle Linux Server 8.7 5.15.0-6.80.3.1.el8uek.aarch64 cri-o://1.26.2-142.el8 $ kubectl get nodes -o wide -l kubernetes.io/arch=amd64 NAME STATUS ROLES AGE VERSION INTERNAL-IP EXTERNAL-IP OS-IMAGE KERNEL-VERSION CONTAINER-RUNTIME 10.0.10.217 Ready node 61m v1.26.2 10.0.10.217 <none> Oracle Linux Server 8.7 5.15.0-6.80.3.1.el8uek.x86_64 cri-o://1.26.2-142.el8
You will notice the MySQL primary pod on the x86 node is now deleted and a new pod is deployed on the Arm64 node. This pod will automatically mount the primary pod’s block volume storage, ensuring data availability after the failover.
We have now successfully migrated the WordPress deployment to a heterogenous Arm64 and x86 cluster. The frontend and application pods of WordPress continue to run on the x86 instances, while the MySQL database primary and secondary pods are now migrated to the Arm64 instances in one OKE cluster.
Once you validate the functionality and performance of your application in a heterogenous cluster, you can then migrate the rest of your application components to Arm64 instances using a similar process and take full advantage of the price performance benefits of an Ampere A1 cluster on OKE.
Appendix
Detailed instructions to deploy the WordPress application on an OKE cluster.
Step 1: Create a 3-node cluster.
Create a OKE cluster using VM.Standard3.Flex shape. Using the Cloud Shell, setup the Kubernetes configuration file (kubeconfig) for the cluster (Cloud Shell Access). Once this step is complete, verify the cluster details using kubectl commands:
$ kubectl get nodes -o wide NAME STATUS ROLES AGE VERSION INTERNAL-IP EXTERNAL-IP OS-IMAGE KERNEL-VERSION CONTAINER-RUNTIME 10.0.10.214 Ready node 9m54s v1.26.2 10.0.10.214 <none> Oracle Linux Server 8.7 5.15.0-6.80.3.1.el8uek.x86_64 cri-o://1.26.2-142.el8 10.0.10.217 Ready node 10m v1.26.2 10.0.10.217 <none> Oracle Linux Server 8.7 5.15.0-6.80.3.1.el8uek.x86_64 cri-o://1.26.2-142.el8 10.0.10.78 Ready node 9m59s v1.26.2 10.0.10.78 <none> Oracle Linux Server 8.7 5.15.0-6.80.3.1.el8uek.x86_64 cri-o://1.26.2-142.el8
Step2: Deploy the WordPress application.
Download the values.yaml for bitnami/wordpress and bitnami/mysql and modify it for your deployment needs:
mkdir -p oci_a1_demo/charts/bitnami-mysql cd oci_a1_demo/charts/bitnami-mysql wget https://raw.githubusercontent.com/bitnami/charts/main/bitnami/mysql/values.yaml cd ../../.. mkdir -p oci_a1_demo/charts/bitnami-wordpress cd oci_a1_demo/charts/bitnami-wordpress wget https://raw.githubusercontent.com/bitnami/charts/main/bitnami/wordpress/values.yaml
Modify oci_a1_demo/charts/bitnami-mysql/values.yaml as shown below. The parameters not shown here can be left at their default values. The nodeAffinity value is used to select nodes to schedule the MySQL pods, we use the Kubernetes.io/arch label to differentiate the x86 and Arm64 nodes. This field will be updated when migrating the MySQL deployment to Arm64 nodes.
architecture: replication auth: rootPassword: "your_db_password" database: "bitnami_wordpress" username: "bn_username" password: "" primary: persistence: enabled: true storageClass: "oci-bv" accessModes: - ReadWriteOnce nodeAffinityPreset: type: "hard" key: "kubernetes.io/arch" values: - amd64 secondary: replicaCount: 1 persistence: enabled: true storageClass: "oci-bv" accessModes: - ReadWriteOnce nodeAffinityPreset: type: "hard" key: "kubernetes.io/arch" values: - amd64 volumePermissions: enabled: true
Modify charts/bitnami-wordpress/values.yaml as shown below. The parameters not shown here can be left at their default values. Use the affinity.podAntiAffinity fields to ensure that Wordpress pods are not deployed on the nodes that have MySQL pods running.
wordpressUsername: user wordpressPassword: "wordpress_user_password" replicaCount: 1 service: type: LoadBalancer persistence: enabled: true storageClass: "fss-wp-storage" accessModes: - ReadWriteMany accessMode: ReadWriteMany nodeAffinityPreset: type: "hard" key: "kubernetes.io/arch" values: - amd64 affinity: podAntiAffinity: requiredDuringSchedulingIgnoredDuringExecution: - labelSelector: matchExpressions: - key: app.kubernetes.io/name operator: In values: - mysql topologyKey: kubernetes.io/hostname volumePermissions: enabled: true mariadb: enabled: false externalDatabase: host: wordpress-mysql-primary port: 3306 user: "root" password: " your_db_password" database: bitnami_wordpress existingSecret: "" memcached: enabled: false
Step 3: Configure persistent volumes for MySQL containers.
MySQL container uses persistent volume claims to provision storage for the database. The Oracle Cloud Infrastructure Block Volume service provides persistent, durable, and high-performance block storage using the CSI volume plugin. Set the “storageClass” parameter in the values.yaml file to “oci-bv” as shown above.
Volumes are only accessible to instances in the same availability domain. We will use the same availability domain when adding new Ampere A1 nodes to migrate the MySQL database.
Provisioning_PVCs_on_BlockVolume
Step 4: Configure filesystem storage for WordPress containers.
The WordPress container is configured to use OCI’s filesystem dynamic storage to allow access to multiple replicas across different nodes. The Oracle Cloud Infrastructure File Storage service provides a durable, scalable, distributed, enterprise-grade network file system. Detailed steps to use the CSI volume plugin to connect clusters to file systems in the File Storage service is documented here:
PVCs_on_FSS-Using-CSI-Volume-Plugin
As described, create a mount target using the OCI console
Define a new storage class that uses the fss.csi.oracleclould.com provisioner using the OCID of the mount target you just created:
$ cat oci_a1_demo/oci-fs-storage-class.yaml --- kind: StorageClass apiVersion: storage.k8s.io/v1 metadata: name: fss-wp-storage provisioner: fss.csi.oraclecloud.com parameters: availabilityDomain: MBWR:PHX-AD-1 mountTargetOcid: <OCID of mount target> compartmentOcid: <OCID of compartment>
NOTE: Add IAM policies to enable the CSI volume plugin
ALLOW any-user to manage file-family in tenancy ALLOW any-user to use virtual-network-family in tenancy
Create the storage class from the manifest file using:
kubectl create -f oci-fs-storage-class.yaml
Step 5: Deploy the MySQL primary and secondary pods using the helm chart.
cd oci_a1_demo helm repo add bitnami https://charts.bitnami.com/bitnami helm install wordpress-mysql -f ./charts/bitnami-mysql/values.yaml bitnami/mysql $ kubectl get pods -o wide NAME READY STATUS RESTARTS AGE IP NODE NOMINATED NODE READINESS GATES wordpress-mysql-primary-0 1/1 Running 0 2m5s 10.244.4.2 10.0.10.78 <none> <none> wordpress-mysql-secondary-0 1/1 Running 0 2m5s 10.244.4.131 10.0.10.214 <none> <none>
Step 6: Deploy the WordPress application pods.
Once the MySQL pods are running, use helm to deploy the WordPress frontend and application pods.
helm install wordpress-demo -f ./charts/bitnami-wordpress/values.yaml bitnami/wordpress
Step 7: Verify deployment status.
Verify that all pods are deployed and in “running” state. This will take a few minutes.
$ kubectl get pods -o wide NAME READY STATUS RESTARTS AGE IP NODE NOMINATED NODE READINESS GATES wordpress-demo-5d8d554d8d-gg2wd 1/1 Running 0 119s 10.244.3.134 10.0.10.217 <none> <none> wordpress-mysql-primary-0 1/1 Running 0 5m23s 10.244.4.2 10.0.10.78 <none> <none> wordpress-mysql-secondary-0 1/1 Running 0 5m23s 10.244.4.131 10.0.10.214 <none> <none> $ kubectl get service NAME TYPE CLUSTER-IP EXTERNAL-IP PORT(S) AGE kubernetes ClusterIP 10.96.0.1 <none> 443/TCP,12250/TCP 22d wordpress-demo LoadBalancer 10.96.215.0 “public ip address” 80:32601/TCP,443:30738/TCP 2m32s wordpress-mysql-primary ClusterIP 10.96.79.218 <none> 3306/TCP 5m56s wordpress-mysql-primary-headless ClusterIP None <none> 3306/TCP 5m56s wordpress-mysql-secondary ClusterIP 10.96.154.29 <none> 3306/TCP 5m56s wordpress-mysql-secondary-headless ClusterIP None <none> 3306/TCP 5m56s $ kubectl get pvc NAME STATUS VOLUME CAPACITY ACCESS MODES STORAGECLASS AGE data-wordpress-mysql-primary-0 Bound csi-d6d15401-9732-4060-9391-fe07993f5f11 50Gi RWO oci-bv 5m31s data-wordpress-mysql-secondary-0 Bound csi-0cfcbf9f-9af9-4060-9063-f8d0ccb8f4f0 50Gi RWO oci-bv 5m48s wordpress-demo Bound csi-fss-44851833-384a-4e3e-bad6-6253d37185a1 10Gi RWX fss-wp-storage 2m38s
WordPress deployment is now complete. You can login to the external IP of WordPress service and view the blog site. Login to “http://<external-ip>/wp-admin” page using the credentials “username:user” and “password:root” , modify the WordPress configuration, add new posts, pages, users etc.
Built for sustainable cloud computing, Ampere’s first Cloud Native Processors deliver predictable high performance, platform scalability, and power efficiency unprecedented in the industry.
Talk to our expert sales team about partnerships or to get more information, or get trial access to Ampere Systems through our Developer Access Programs.
Ampere Computing LLC
4655 Great America Parkway Suite 601
Santa Clara, CA 95054


